Channels: #
Main Server: #
- 「📊」voting: The location of polls of recruits for members to vote on, you now have access to create these.
- 「💼」rec-stuff: The main bot spam channel, used to be the main recruitment channel before the staff discord, so it has old logs of stuff.
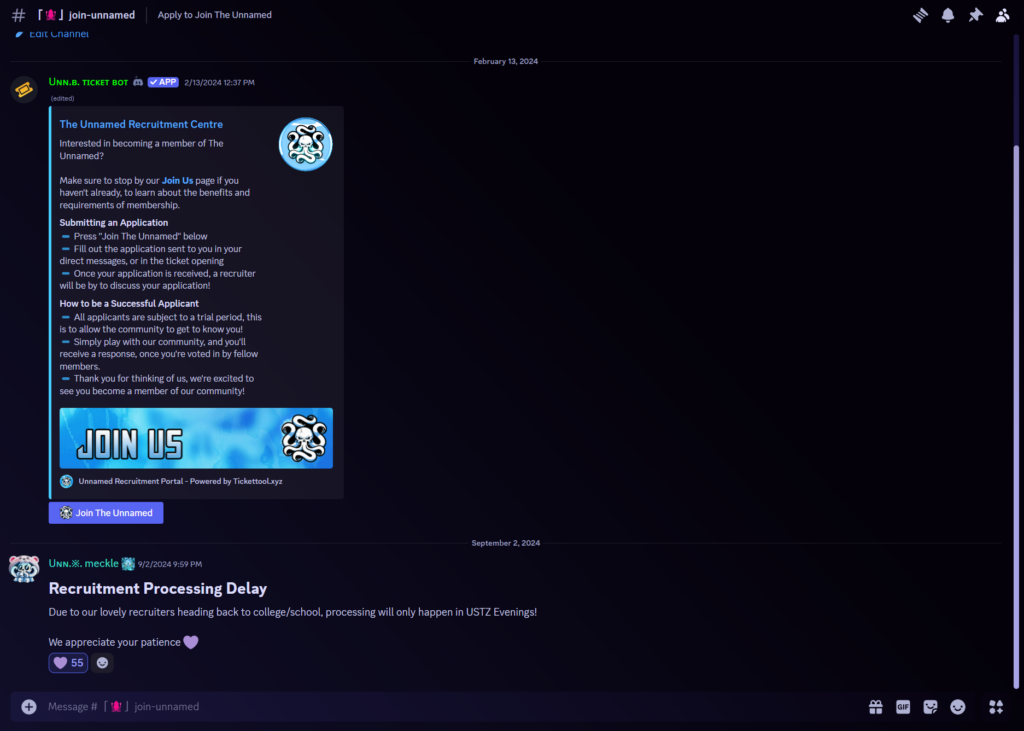
- 「🦑」join-unnamed: The location of all applications. They appear in thread formats under the channel and you can find all of the inactive ones via the thread button in the channel.
- 📋︱app-log: The location of bot messages when a user gets the recruit role. It pings them (only visible to staff) with a message that they received the recruit role.
- 💼︱role-log: The location of all staff role updates. Most, if not all staff roles, when applied to a user get shown here similar to how the app-log has it.
- 📋︱unn-log: The location of role updates sent by the bot when somebody gets the Unnamed Member role.
- 🎫︱ticket-archives > applications-archive: The location of all application ticket transcripts. Only shown after ticket is closed.
Staff Server: #
- 「🔋」rec-lounge: The location of the main recruitment chat. This is where we discuss recruitment topics and ideas.
- 「🔋」member-data: The location where all necessary information about recruits is stored. You have access to create these and are required to for each recruit.
- 「🔋」community-apps: The location of all applications once completed by the applicant.
- 「🔋」acceptance-logs: The location of all acceptance messages and information used for member acceptances, used by management for logging the info, only viewable by all recruiters.
Commands: #
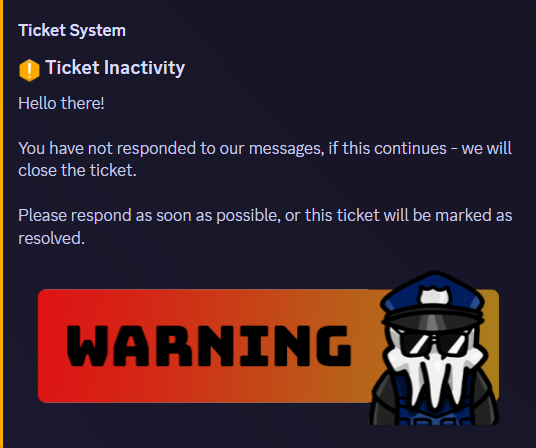
!ticketafk #
Used when an applicant has not responded in their ticket or submitted their application within 24 hours of creation.
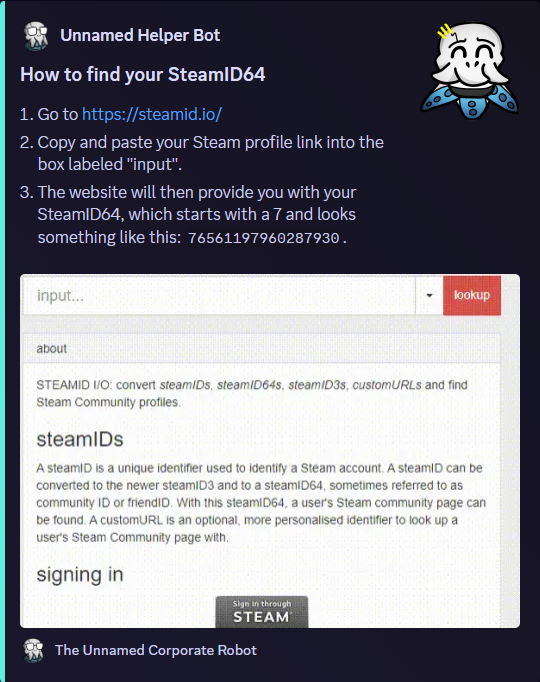
!steamid #
Used to help an applicant find their Steam64 ID, displays a prompt with the steps and a website to use. This is only needed for Squad applicants.
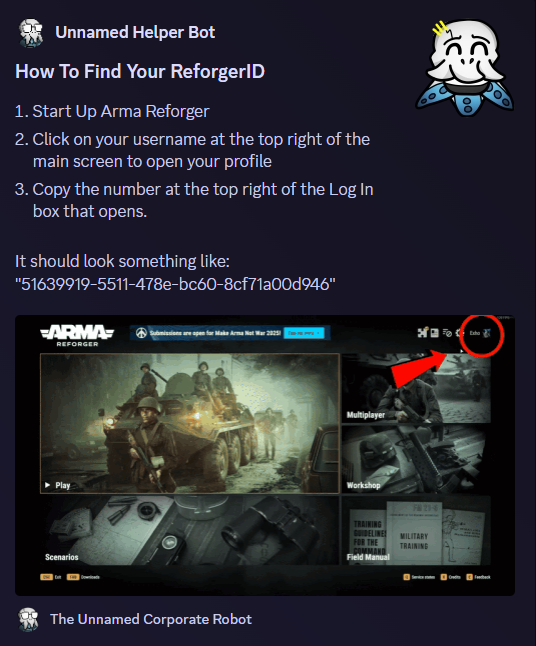
!reforgerid #
Used to help an applicant find their Reforger ID, displays a prompt with the steps on how to get it. This is only needed for Arma Reforger applicants.
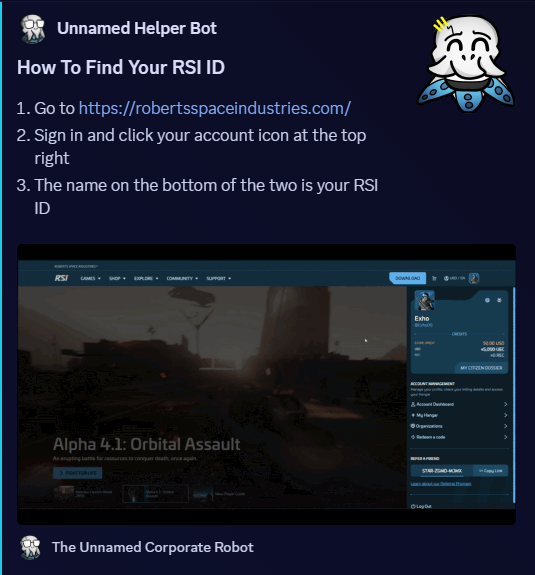
!rsiid #
Used to help an applicant find their RSI ID, displays a prompt with the steps on how to get it. This is only needed for Star Citizen applicants.
!wtid #
Used to help an applicant find their War Thunder IGN, displays a prompt with the steps on how to get it. This is only needed for War Thunder applicants.
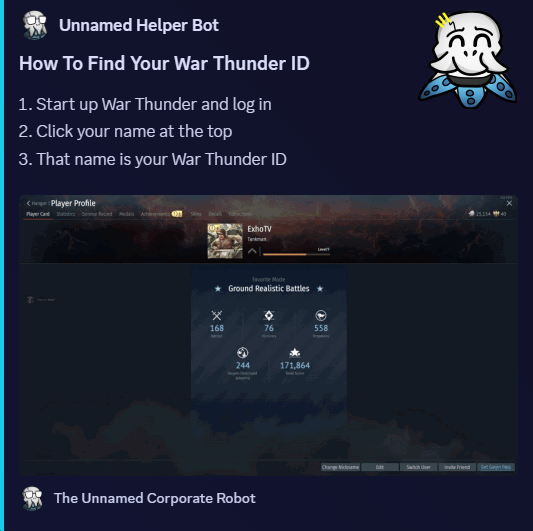
!duneid #
Used to help an applicant find their War Thunder IGN, displays a prompt with the steps on how to get it. This is only needed for War Thunder applicants.

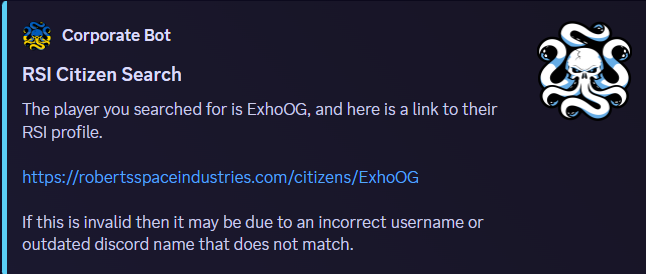
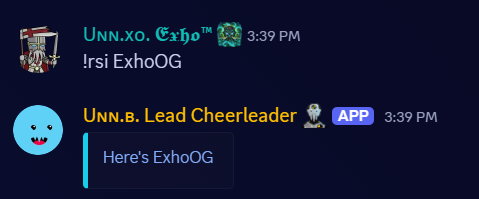
!rsi *rsiid* #
Used to find an applicants RSI page, displays a prompt with a link to their account viewable by anyone. This is only needed for Star Citizen applicants.
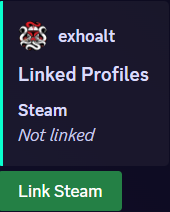
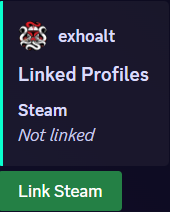
/profile (unlinked) #
Used to link an applicants Discord to our Squad servers, when unlinked it appears like the image below. This is only needed for Squad applicants.
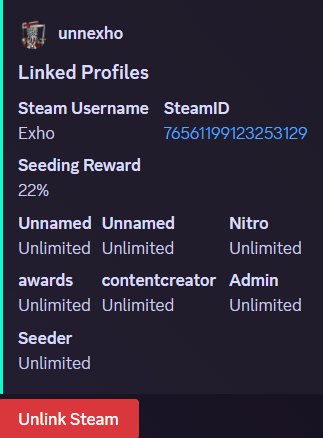
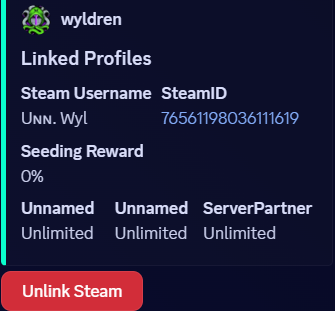
/profile (linked) #
Used to link an applicants Discord to our Squad servers, when linked it appears like the image below. This is only needed for Squad applicants.
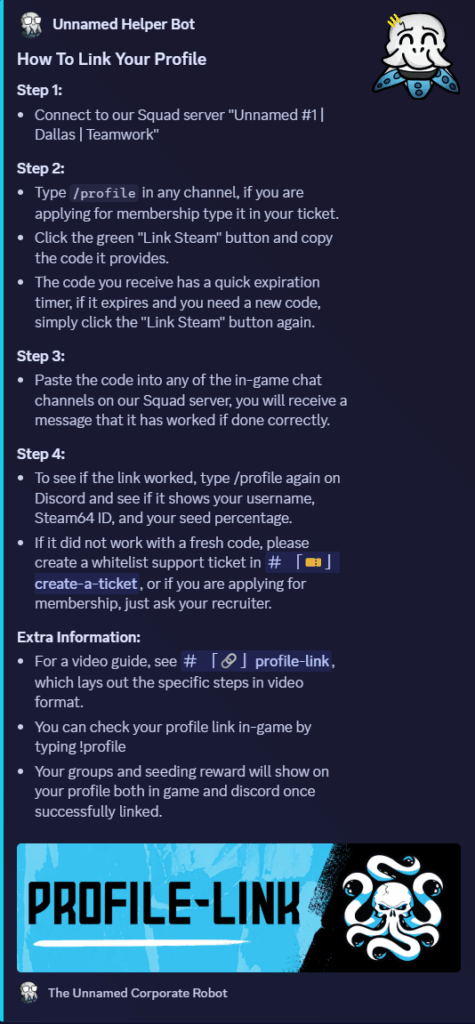
!profilelink #
Used to show a Squad applicant how to link their profile.
/recmenu #
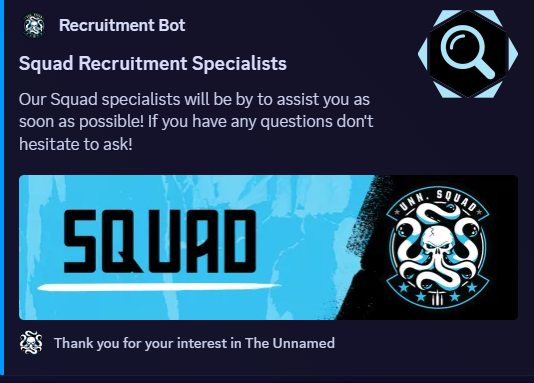
Used to ping specialized teams for an application. Selectable options include Squad, Star Citizen, Arma Reforger, War Thunder, and Community Specialists. The specialists it pings are the most experienced in that game/field.

Squad Example:
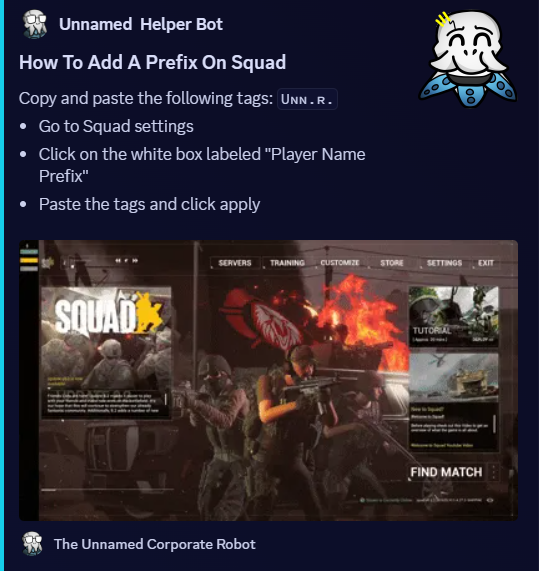
!sqprefix #
Used to show a Squad applicant how to get the tags pasted into their Squad prefix.
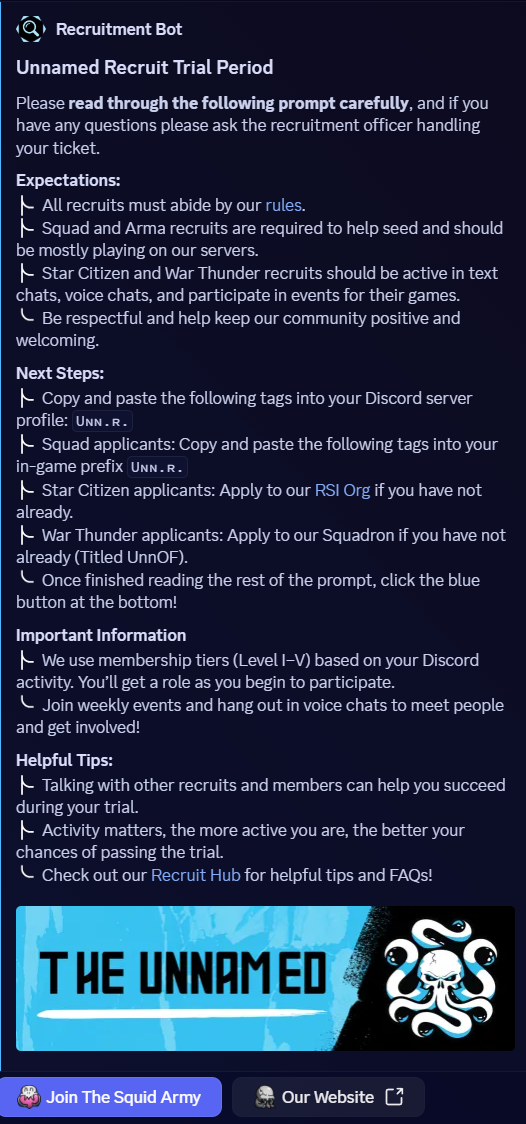
!recapp or /recapp (interchangeable) #
Used to give an applicant the recruit role, displays a prompt with instructions. This is the final step in the applicants process before they become a recruit.
Tickets and Applications: #
The application process begins once an applicant opens a ticket in the #join-unnamed channel. This will appear in thread format just below the channel.

Once an applicant opens a ticket, they will be sent a DM from the ticket-tool bot with the link to the application, however they can also find this link at the top of their ticket.
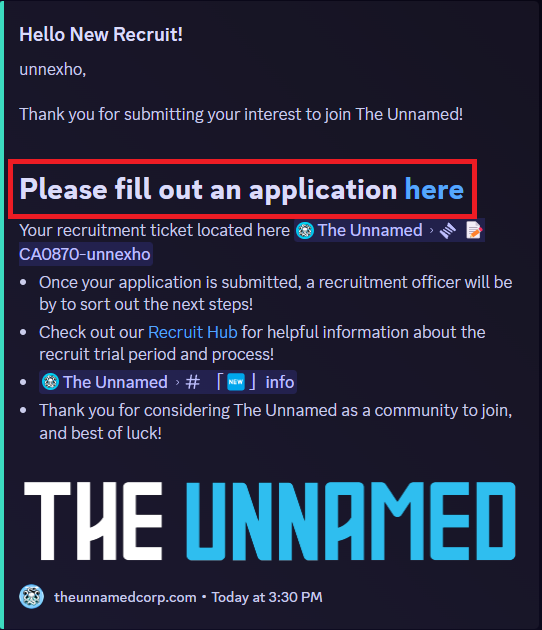
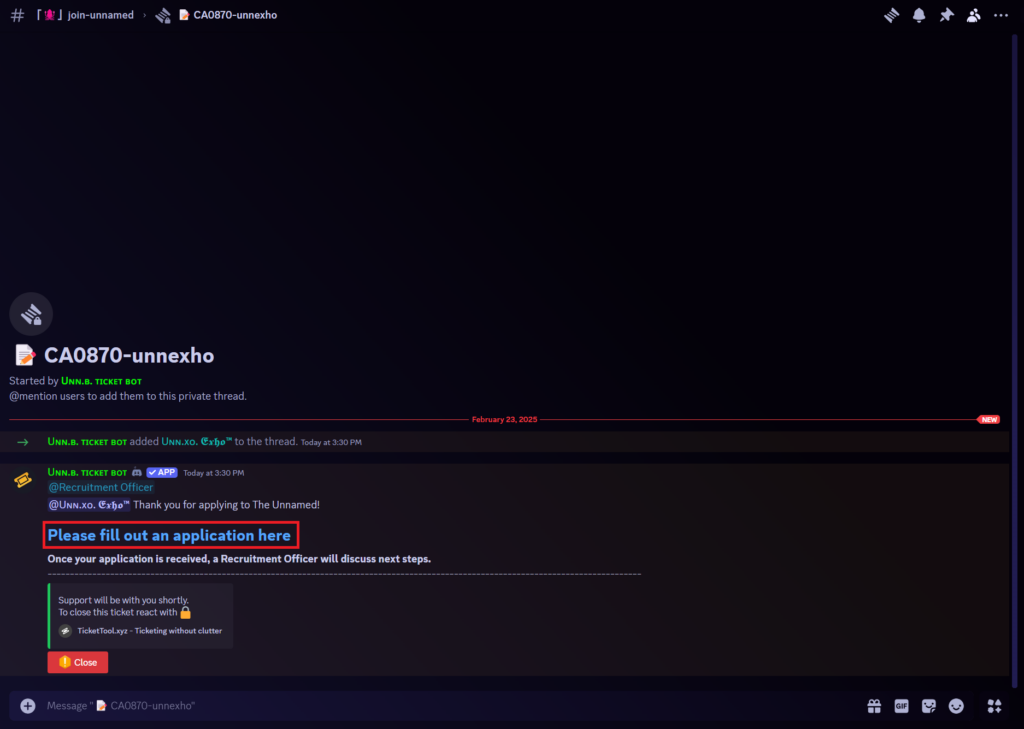
Greeting The Applicant: Upon the opening of a ticket, you are expected to professionally greet the applicant, tell them to fill out the application if they have not already, and ask if they have any questions. Once doing this, you have claimed this ticket and are expected to process the applicant, however if you cannot please inform the team in the #rec-lounge so they know they can take it.
Claims: Tickets are done based off of first come first serve claims. Whichever Recruitment Officer types first in a ticket has claim on said ticket, meaning that you should not be typing in that ticket without asking the claiming Recruiter. The only people with an exemption to this rule are Recruitment Managers and Executives, who may be stepping in to correct something or assist.
Applicant View: #
The applicant sees the following when filling out the application:
If a user selects the “Community” option for the “Applying To Unn. For”, it will take then m to a different page than shown in the video, however the only difference is that a few questions are removed (such as the ID’s and exclusivity agreement)
Recruiter View: #
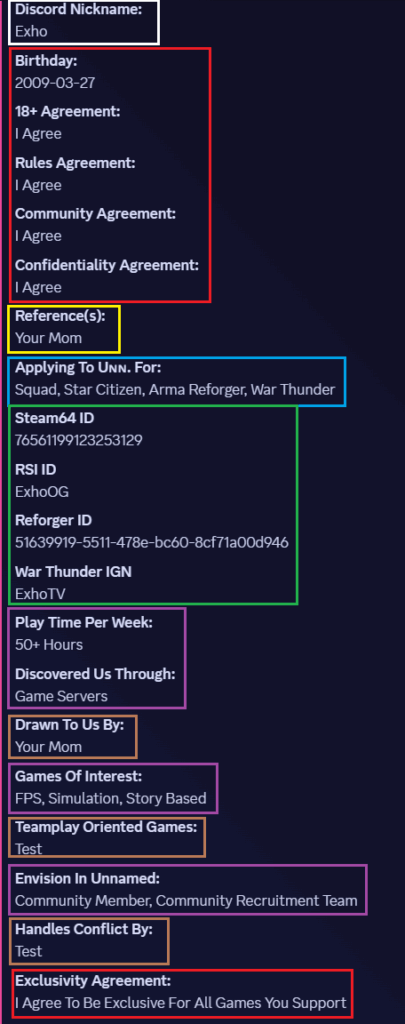
Once an applicant fills out the application, you will receive a ping in #community-apps. You are expected to read through each answer and check the correct information shown in the steps below.
Things To Look For: #
- White Box: Confirm the application you’re looking at is the correct one. Sometimes a recruiter can be looking at the wrong application since multiple come in at a time, it happens so just keep an eye out.
- Red Boxes: All applicants must fully agree to all listed agreements completely. If an applicant cannot agree to any of them, ask if it was a mistake. If it was just note on their member-data (shown later in the guide) that they updated to agree.
- For Exclusivity, there are 6 options: I agree for all games, I agree for game specific (squad only, arma only, etc), and I don’t agree. If an applicant is applying for more than one supported game (Squad + Arma for example) and they only select “I can be exclusive for Squad only”, we will ask if they are able to agree to exclusivity for Arma as well. If they cannot, then they can’t be a member for Arma, but are able to proceed for Squad.
- Yellow Box: If an applicant lists a reference, that reference must be a Unn member (recruits and blueberries don’t count). For a reference to count, we have to confirm it first by messaging the user listed and saying something along the lines of “user listed you as a reference on their membership application, are you okay being listed on their poll”. If they are okay being listed you’ll keep them on it, if they want to remove their name we will just remove it, there’s no need to inform the applicant about it.
- Blue Box: To see what steps you’ll have to do, you’ll first have to see what games the applicant is applying for. For Squad, we have to check their Battlemetrics and link their profile, for Star Citizen, we have to run a background check on the RSI website, for Arma Reforger we have to check their Battlemetrics, and for War Thunder we have to check their Squadron status (Ping Tazville or Exho to check War Thunder stuff). All guides for these are shown down the page.
- Green Box: To get all of the ID’s needed for the background checks, they will be listed here. If an applicant does not put anything in one of the boxes, that box will not appear on the application on Discord. We only need Steam ID for Squad applicants, Reforger ID for Arma Reforger applicants, RSI ID for Star Citizen applicants, and War Thunder IGN for War Thunder. If they do not fill one out for a game they aren’t applying for, we don’t need it.
- Pink Boxes:
- Brown Boxes:
Battlemetrics Guide: #
There are a few steps needed for Squad and Reforger applicants after looking over their application. First you will need to look at their Battlemetrics, steps shown below.
Firstly, you will need to go to the “Players” tab at the top of the page on Battlemetrics.

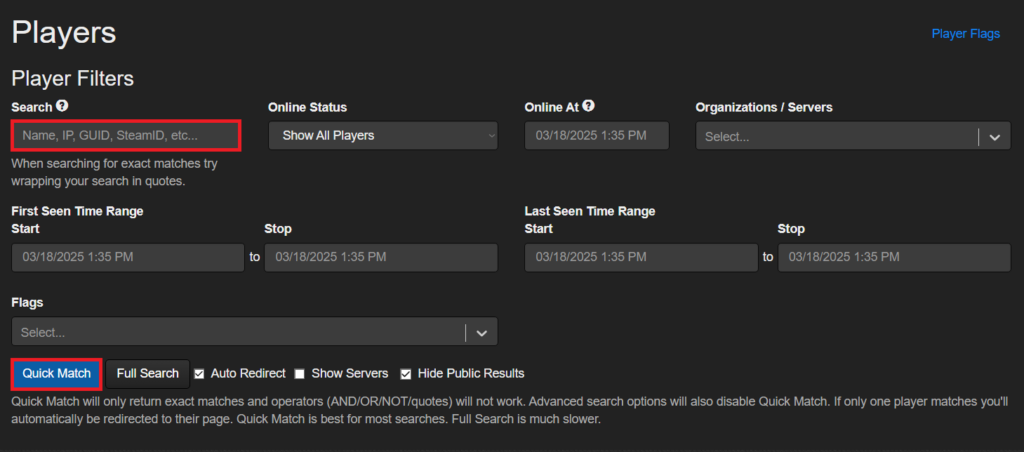
Once there, you will see the page shown in the image below. On this page, the main areas you’ll need are highlighted.
The section labeled “Search” is where you will paste the applicants Steam64 ID/Reforger ID into, and then you will click “Quick Match” which will take you to their Battlemetrics page.
- If you receive a message that says “We were unable to find any players that matched your query” (also shown in the image below), then the applicant likely gave you the wrong Steam64 ID/Reforger ID. This happens! So in their ticket, just type “!steamid” or “!reforgerid” (depending on the game) and tell them to follow the steps and to send you the ID they get after following said steps.
- If you continue to get the error message with the new Steam ID/Reforger ID, ask if they have played on our servers before, since a user will not show up if they have not connected to our servers.

If the applicants Steam64 ID works, then you will see a page similar to the one shown below.
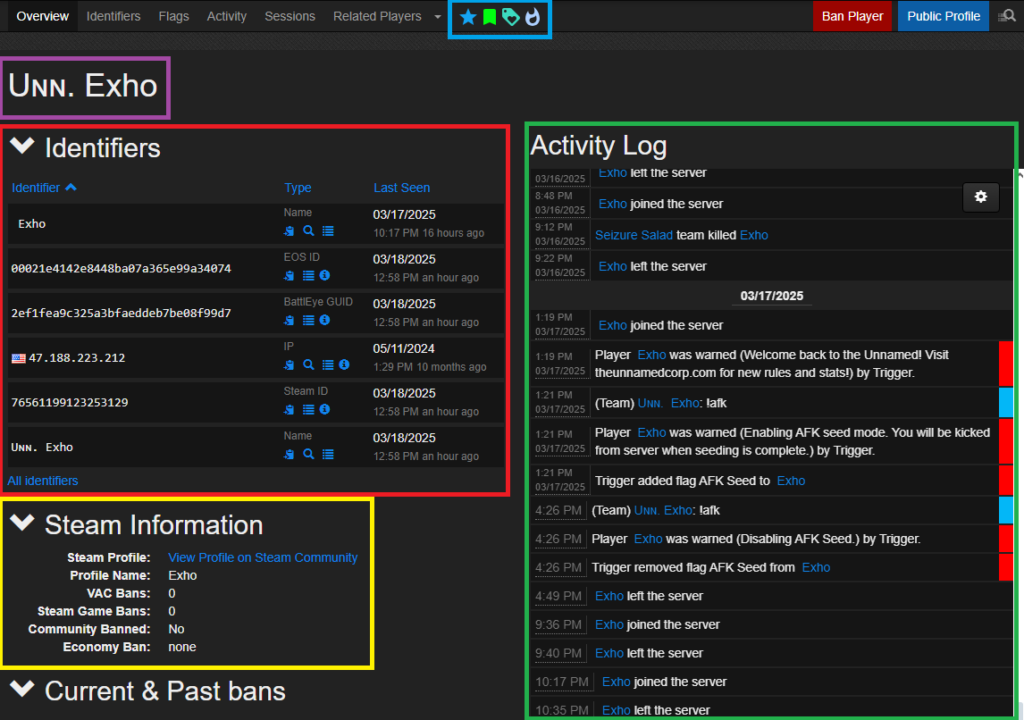
- Red Box: All previous identifiers (usernames and Id’s), you will want to check this for any previous name history that might cause problems or show any red flags. You can select the blue “All Identifiers” button just below the box to open the page to view all of them.
- Green Box: All user activity in game is shown, you can give this a light skim through just to make sure the applicant is not a problem player or being toxic/negative constantly.
- Yellow Box: This will show all of the basic Steam information, if the user has a VAC ban, that means that they were banned from cheating on a game. If the time since ban shows over 365 days then they are able to connect to our server, however we would like to see plenty of in game activity on our server (so we can make sure they aren’t going to cheat again) before allowing them to join. Minimum 400 days since last VAC ban to apply.
- Blue Box: These are all of the user’s flags. If you hover your mouse cursor over one of the icons it will show when it was added and what it is for. These are used when there is not enough evidence for a ban or if a user was kicked, but overall to show that they have a history. If you see any flags that are recent you can bring it up with them, but if there are any that you believe are disqualifying for membership you can always ask in #rec-lounge. Use your best judgement.
- (Not boxed) Current & Past bans: This is where bans will appear if a user has any. This is something that is very important to pay attention to. If a user has a ban it will show as a blue link with the reason why they were banned, the community they were banned from, and the date they were banned. We do not allow applications within one month of a ban and use your best judgement from there, depending on how long ago the ban was be sure to bring up our rules and have them read through those and promise not to break them.
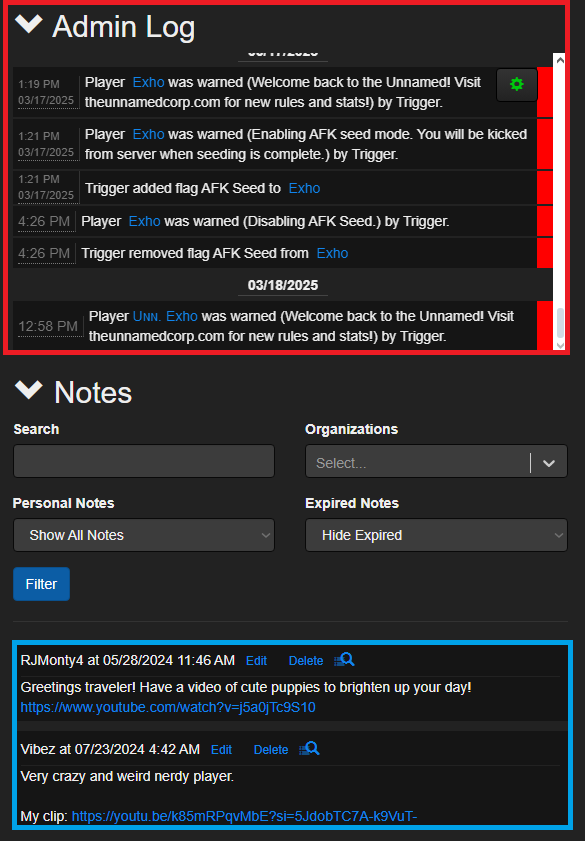
- Red Box: This box is all admin messages that have been applied to this user, these do include bot messages so it is a very full area and not too important.
- Blue Box: These are notes, which can be applied from our admin team or other communities’ admin teams. These can be used to leave a message on a players profile to highlight bad history of something or a report, read through these carefully if you see one and if there is one about cheating (very rare) please inform the Recruitment Management team and let them handle it.
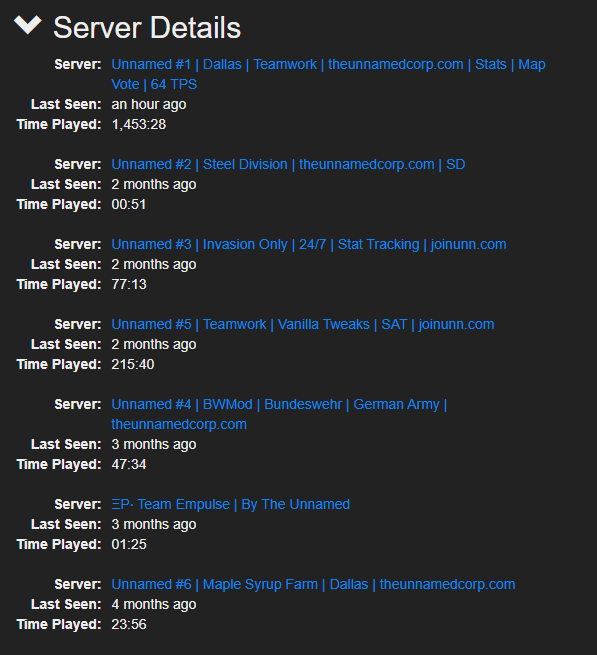
- The image above shows the amount of playtime per server, you will likely not see as many servers as shown above, more likely one or two. Our minimum playtime is 5 hours, if an applicant has not reached that time (or very close to it), then tell them to come back once they’ve played on the server a bit.
- The Arma Reforger Battlemetrics page looks slightly different. It only shows connections and disconnections in the activity log, current username and Reforger ID, and only notes/bans from The Unnamed.
Profile Linking: #
When a user needs to link their profile, they will need to type a code into any of our Squad servers.
- This code can be found by typing /profile and selecting the ‘user’ option, and selecting their user in their ticket.
- From there they will click the green button that says “Link Steam” and will need to type the code it DM’s them into one of our Squad servers. This code has a quick expiration timer, so be sure to inform them of that and have them click the button once in the server. If they do it too soon they can just click the button again for a new code.

Once an applicants profile has been linked, it’ll look similar to the following image:
RSI Guide: #
Main RSI Page: #
When an applicant applies for Star Citizen, you will first need to look at their RSI page. To do this you will get their RSI ID from their application (if they didn’t provide it ask in their ticket and use the command !rsiid to show the steps on how to get it) and type !rsi *rsiid*.
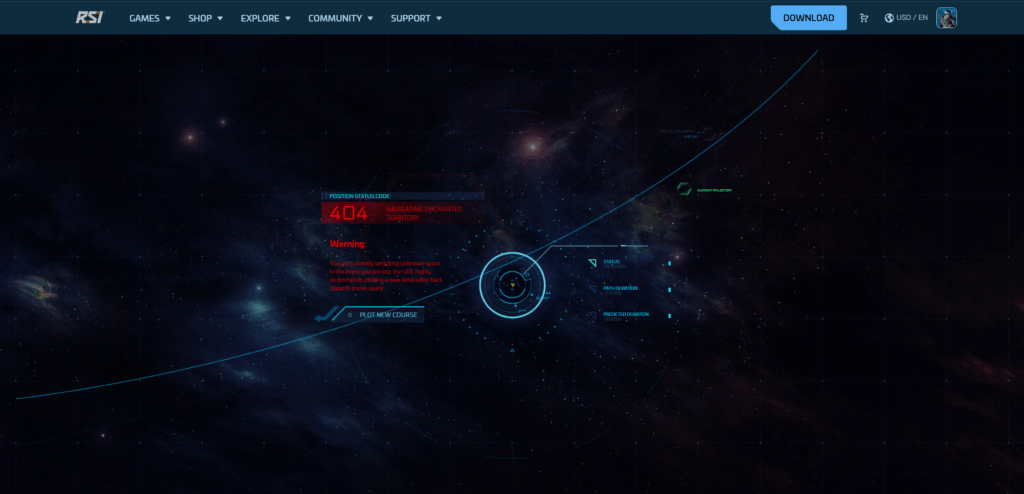
If you get a “404 Not Found”, you were given the incorrect RSI ID. Use the command !rsiid in the applicants ticket and tell them to follow the steps and provide you with their RSI ID.
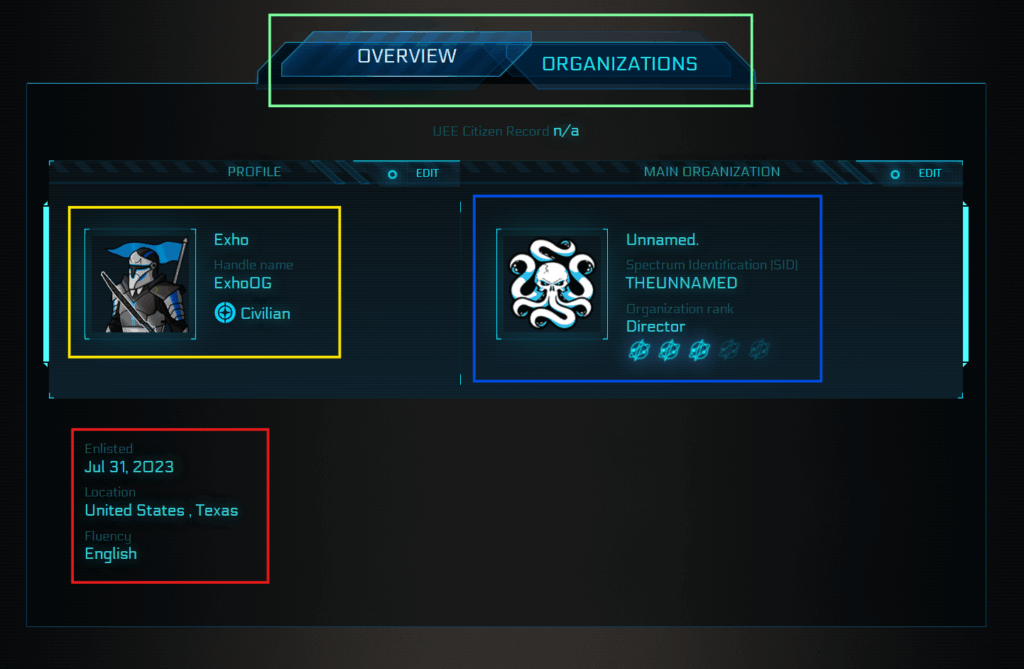
- Yellow Box: Check that the profile is the correct one by confirming the name/RSI ID matches.
- Red Box: Check when the applicant enlisted (created an account). If it is within two weeks of their application, they will not be permitted to continue unless they have a confirmed reference.
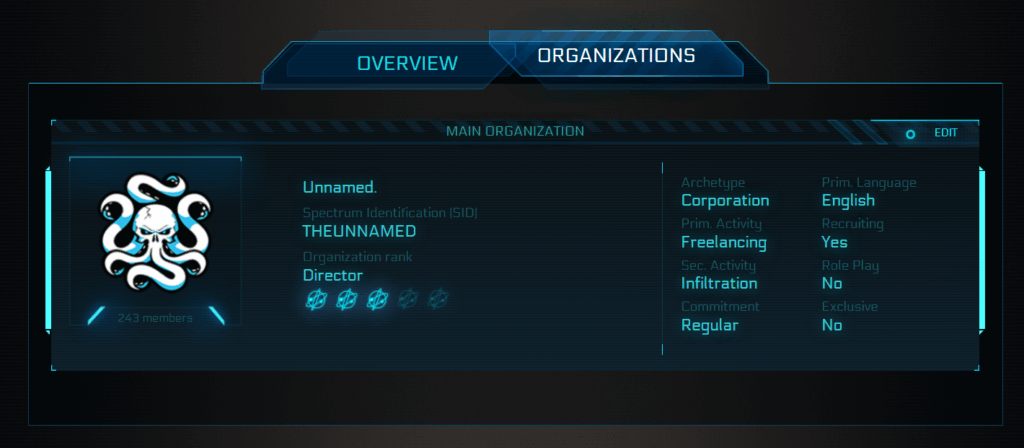
- Blue Box: Check to see if the applicant is in any organizations, the blue box will only show their main org if they are in one, you will need to open the organizations tab at the top to view affiliate orgs. Unnamed is required to be the main org for all applicants, if they are in an org inform them that they must leave that org and make ours their main. Affiliate orgs are only allowed if they are on the approved list pinned in #rec-lounge.
- Green Box: The Overview tab shows the basic information for each applicant, however the Organizations tab shows all org info for a user. Check the organizations tab to view what orgs the applicant is in, there are only a few approved affiliate orgs (list pinned in #rec-lounge), but all applicants are required to have Unn as their main org. Image of Organizations page shown below.
Spectrum: #
The Spectrum part of RSI shows a more in depth view of an applicant. This is where you can see their activity throughout the RSI community and any organizations they are affiliated with. Link to Spectrum page
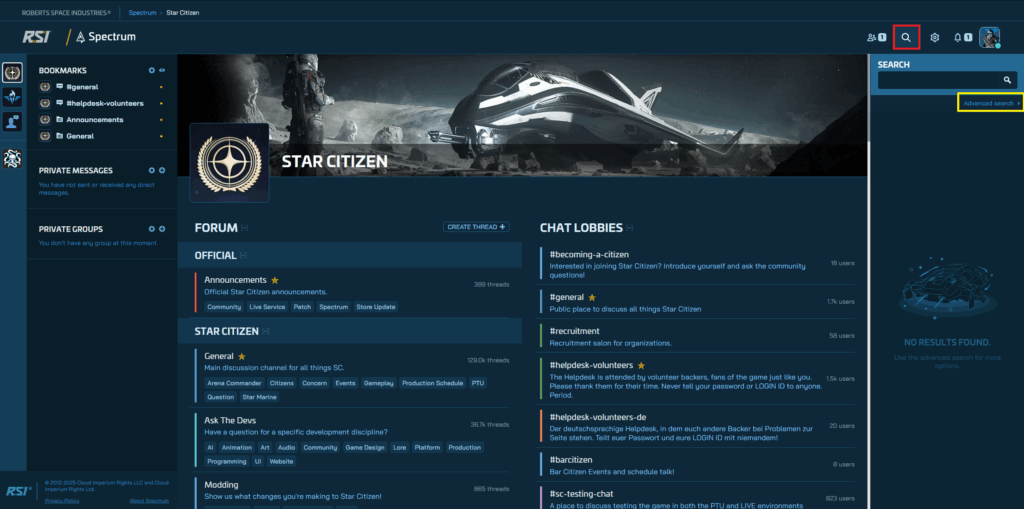
- Select the magnifying glass (red box) and then click Advanced Search (yellow box)
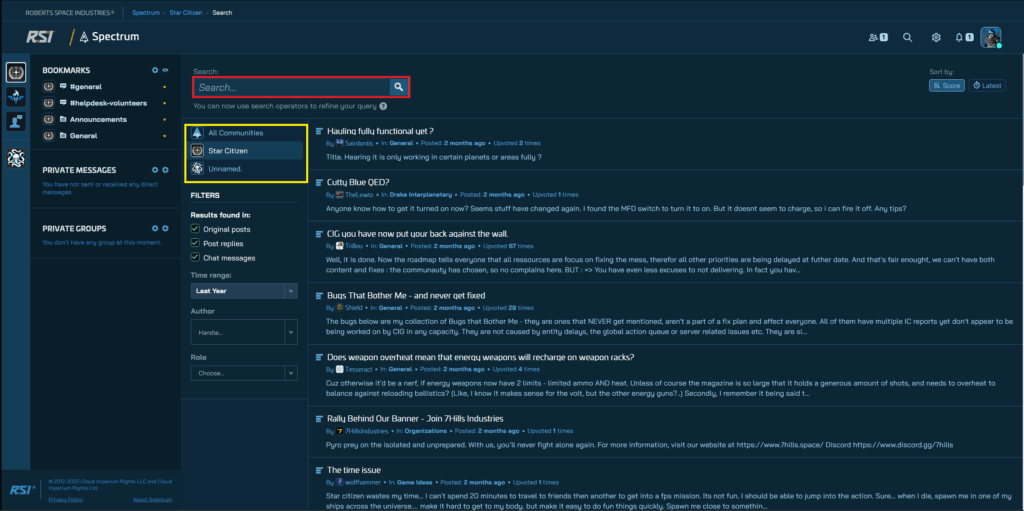
- Red Box: Input the applicants RSI ID into the search bar and click enter
- Yellow Box: Confirm that Star Citizen is the selected option, otherwise the search will not provide proper results.
If you get a “No Results Found”, check other sources such as their Steam profile and Discord activity
Approval To Recruit: #
Once you have completed all background checks and all other steps listed above, you will send a prompt in the applicants ticket which will give them steps on what to do next.
- Type !recapp or /recapp (interchangeable) which will send a prompt with information on what to do next for the applicant with steps and instructions. Tell the applicant to read through carefully and to follow each step listed in the prompt.
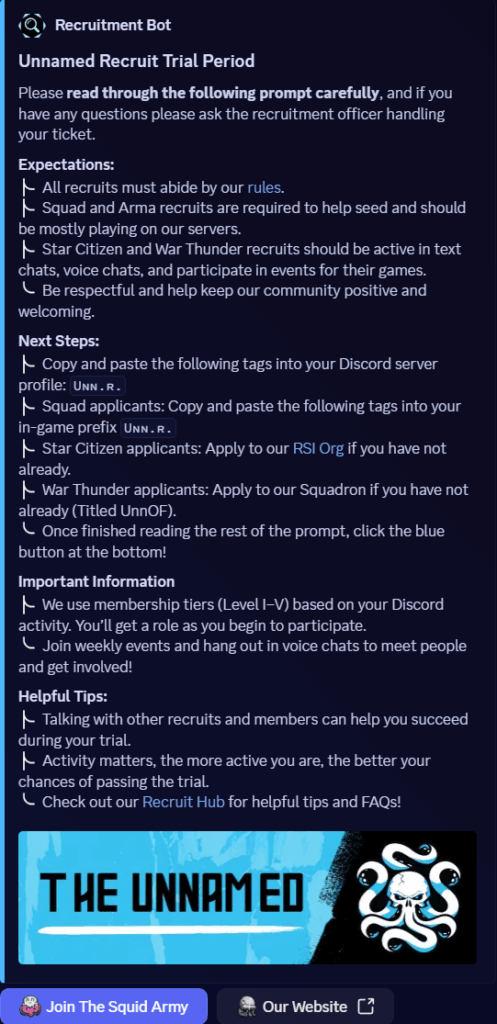
- Once the applicant clicks the blue “Join The Squid Army” button, they will be automatically given the recruit role which comes with new channels and perms.
You will be able to tell once an applicant clicks the button once the message shown below is sent in the ticket.

Once the applicant becomes a recruit, you will send a message giving them a few last steps on what to do. A good message to base yours off of is shown below:
- Looking good! Be sure to get the tags copy and pasted into your discord server profile, if you need help doing that let me know! Go ahead and introduce yourself in #introductions, you can chat with other members and recruits in #recruit-tent, hang out in some channels such as #lobby and #squad-chat/#sc-chat/#reforger-chat/#wt-chat, and if you have any questions during your trial period feel free to reach out to me or one of our other recruiters!
Also I highly recommend reading through our Recruit Hub for some helpful tips on how to be successful during your trial period! Let me know if you have any questions, I’ll leave this open for about a day or so 🙂
- Squad applicants have one extra step than other supported games applicants. All Squad applicants must add the tags into their in-game prefix. If they do not know how to do this, type !sqprefix in their ticket which will send a prompt showing them how to do it.
Voting: #
Once you have sent your message with the final steps, you’ll need to create their poll. To do this, go to #voting and type /poll. Fill it out the same as the image below

Once you have posted the poll, you’ll need to get the information from their application to put it in a thread under the poll.
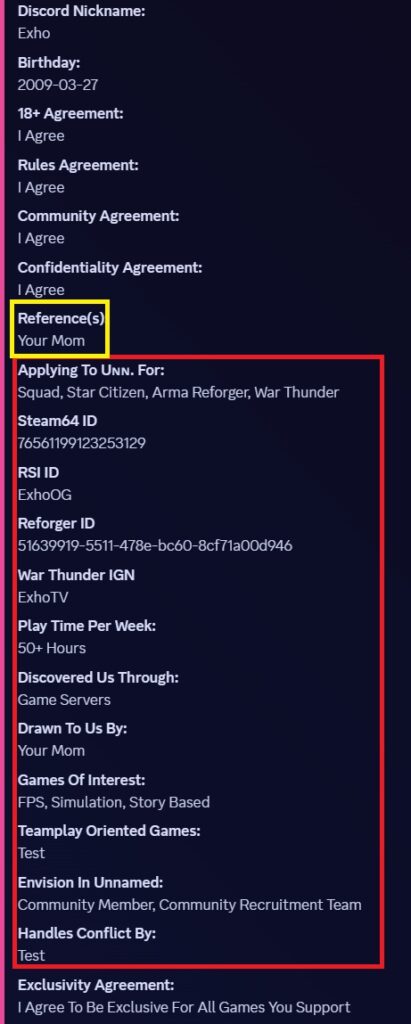
You will copy everything shown in the red box above and paste it in a thread on the applicants poll. The only time you will include the yellow box in that is once you’ve confirmed a reference with the referenced person.
- Once all of the information above is copied, you will go back to #voting and right click their poll, then click “Create Thread” and paste the information in the text box provided (image below for reference)
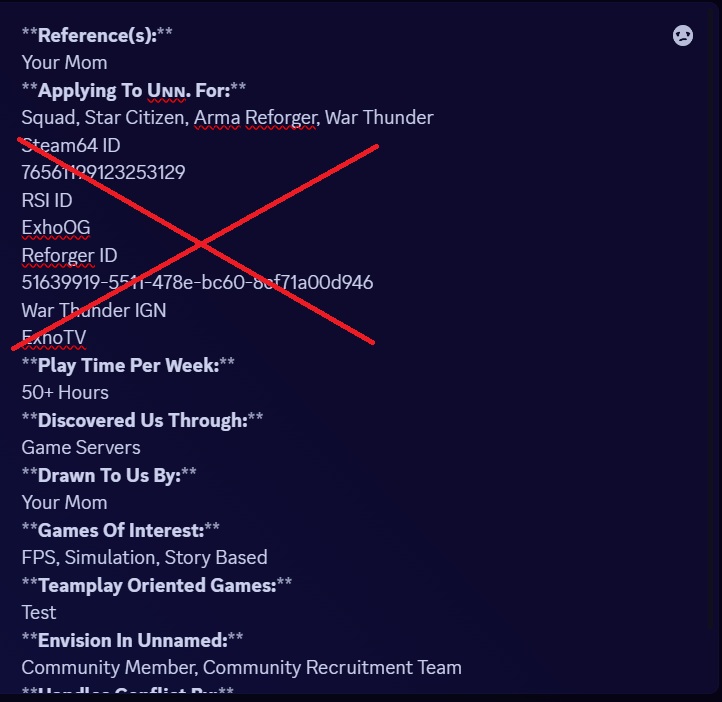
- In the thread information, you will remove all ID’s listed (Steam ID, Reforger ID, RSI ID, War Thunder IGN).
- You should also bold all questions to make it easier for our members to see, to do this just highlight the question and click the B shown once you’ve done that, or put two (**) at each side of the question shown in the image above.
Member-Data: #
Once you have gotten their poll up and completed all other steps, you will need to fill out the applicants member-data in the #member-data channel.
- First, you will need to go to #member-data and click “New Post” at the top.
- The title of the post should be the applicants username and the information in the post itself should come from the pinned template.
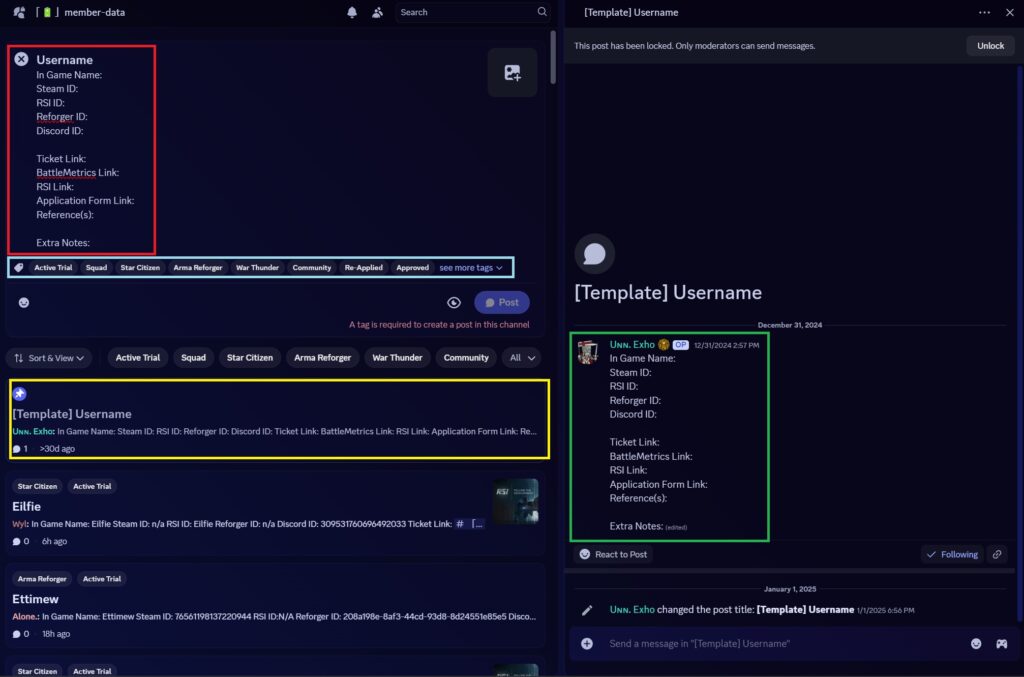
- Red Box: Copy and paste the text from the Green Box into the message area in the Red Box. For the title, named “Username” in the example, put the applicants username there.
- Blue Box: Select the proper tags for the post, these include the game(s) they are applying for and the Active Trial tag.
- Yellow/Green Box: To get the text to put in the message on your post, open the Yellow Box (pinned post) and copy the Green Box’s text.
Extra Information: #
- Exclusivity just means the applicant cannot be a member or admin of another community for the game they are applying for. They are still allowed to play on other servers but should main ours and help seed ours.
- All applicants with a ban must wait a minimum of one month until being able to join. Bans such as racism or hate speech are 8 months to 1 year minimum.
- More to come, I’m just too tired to think of anything else right now


