 Skip to content
“If you know the enemy and know yourself, your victory will not stand in doubt…”
― Sun Tzu, The Art of War
Introduction #
Streamlining combat systems, loadouts, and strategies, sets a baseline for the Field Commander(s) leading any operation, ensuring that they can apply the tools at their disposal for the right situation.
The information provided within this section is intended to give you a better understanding of the best practices as determined by research and insight of the Star Citizen community at large, and consideration by the Unnamed leaders responsible for the Navy wing.1

Outfitting Basics #
Armour #
Aside from the visual swankiness of the armour sets, there are some key statistics2 you want to be aware of for the different classes of armour, a summary of which have been outlined in the table below. The key thing is to ensure you are avoiding taking as much tiered injuries as possible, which may end up affecting your movement, aim or functionality in general.
| Armour Type | Damage Reduction | Primary Weapon | Sidearm & Utility | Magazines | Grenades & Other | MedPens |
|---|---|---|---|---|---|---|
| Flight | 10% | 0 | 1/1 | 0 | 0 | 2 |
| Light | 20% | 1 | 1/2 | 4 | 2 | 3 |
| Medium | 30% | 1 | 1/2 | 4/6 | 2 | 4 |
| Heavy | 40% | 2 | 1/2 | 8 | 4 | 4 |
Movement speed: This is surprisingly not impacted much by armour type, however, it is based on the amount of equipment you’re carrying, which weighs you down. What you want to remember when it comes to movement is:
- Using medium arms and legs provides a speed boost, even if you’re wearing a heavy head and torso piece
- Heavy armor doesn’t make you slow – guns and ammo do
- Only equipped items on your character are relevant (i.e. store them in your backpack)
- Items have different weights, regardless of their size (e.g. Gallant and Demeco ammo has same uSCU size but different weights)
Environmental protection: Planets, bases and even space have varying environmental factors which will impact your ability to function optimally. Ensure to review the location details of any place you intend to traverse, and confirm that the protections parameters of your gear are adequate (e.g. temperature rating).
Primary Weapons #
| Weapon | Damage Type | Magazine | Bullet Speed (m/s) | Firerate | Damage per Second (DPS) | Effective Range (m) |
|---|---|---|---|---|---|---|
| Custodian | Energy (Laser) | 60 | 600 | 900 | 166.5 | 1200 |
| Gallant | Energy (Laser) | 45 | 1200 | 900 | 285 | 2400 |
| Karna | Energy (Plasma) | 35 | 600 | 600 | 175 | 30 |
| P4-AR | Ballistic | 40 | 550 | 810 | 162 | 40 |
Explosives & Throwables #
- Grenades that are equipped on your suite, can be accessed by “G” as the default key.
- Primary fire (left mouse click default) will provide you with a throwing trajectory, as well as pull the pin and start cooking the grenade.
- Trip-laser mines located on surfaces can be detonated by either shooting at the mine or by moving any physical object, including dead bodies, past the laser using your multi-tool.
Equip-ables #
- Other items that can be equipped to the equipment slot on your armour include fuses, light sicks, and QuikFlares.
- In order to use a QuikFlare as a light source, ensure to activate it using the radial menu while either looking at it or holding it in your hand.
Standard Loadouts #
Flex Kit
- Armour: Heavy set with optional medium arms/legs
- Primary Weapon: Choice of Karna, P4, Gallant, Custodian
- Secondary Weapon: Choice of handgun (optional)
- Magazines: 10+
- Backpack: Heavy (large)
- Medical: ParaMed Medical Device (+1 refill) + MedPen Hemozal (red)
- Utility: MultiTool + Tractor Beam
Medical/Support Kit
- Armour: Heavy core/helmet with medium arms/legs (Full medium set as alternative)
- Primary Weapon: Choice of Karna, P4, Gallant
- Secondary Weapon: None
- Magazines: 10+
- Backpack: Heavy (large)
- Medical: ParaMed Medical Device (+2 refill) + MedPen Hemozal (red)
- Utility: MultiTool + Tractor Beam
Radiation Kit
- Armour: Full Sterling Rad Suit
- Primary Weapon: Choice of FS9 / Demeco LMGs
- Secondary Weapon: Choice of handgun (optional)
- Magazines: 30+
- Backpack: Large
- Medical: ParaMed Medical Device (+1 refill) + MedPen Hemozal (red) + Decon Pen (yellow)
- Utility: MultiTool + Tractor Beam
Recon Kit
- Armour: Full medium set
- Primary Weapon: Choice of Scalpel / A03
- Secondary Weapon: Choice of handgun (optional)
- Magazines: 10+
- Backpack: Medium
- Medical: ParaMed Medical Device (+1 refill) + MedPen Hemozal (red)
- Utility: MultiTool + Tractor Beam
Standard Kit
- Armour: Full heavy set
- Primary Weapon: Choice of Karna, P4, Gallant, Custodian
- Secondary Weapon: Choice of handgun (optional)
- Magazines: 10+
- Backpack: Heavy (large)
- Medical: ParaMed Medical Device (+1 refill) + MedPen Hemozal (red)
- Utility: MultiTool + Tractor Beam
Vacuum Kit
- Armour: Full heavy set
- Primary Weapon: Choice of Karna, Gallant, Custodian
- Secondary Weapon: Choice of handgun (optional)
- Magazines: 10+
- Backpack: Heavy (large) + Extra helmet / Under suite
- Medical: ParaMed Medical Device (+1 refill) + MedPen Hemozal (red)
- Utility: MultiTool + Tractor Beam
Vacuum Crew Kit
- Armour: Flight Suite (Light set recommended)
- Primary Weapon: Choice of Karna, Gallant, Custodian (optional)
- Secondary Weapon: Choice of handgun (required)
- Magazines: 2+
- Backpack: N/A
- Medical: ParaMed Medical Device
- Utility: MultiTool + Tractor Beam
Movement & Positioning #
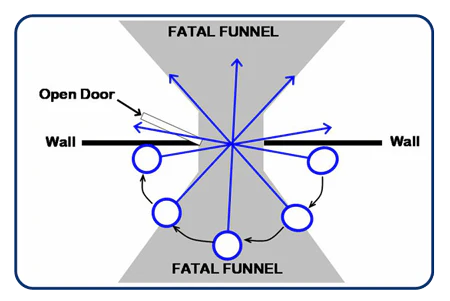
There are 3 basic aspects to remember when entering a room with a team, the fatal funnel, verticality, and doors & corners. Each has been briefly covered below, but takes practice to condition yourself and your team to execute regularly – most importantly, being vocal about your actions is essential to coordination.
- Fatal Funnel: The “fatal funnel” is a term used for an area within the opening of a point of entry where most fatalities occur during an active threat situation.
- Verticality: It is easy to forget looking above and below you when first entering a space, typically an ambushing force will find high ground to get a better angle on the entry point. Just as you would check your side-view mirrors when driving, continuously clearing verticality.
- Doors & Corners: In the words of Miller from the Expanse, “doors and corners, kid. That’s where they get you…” The premise behind this quote is simple, when entering a space, you want to clear corners and points of entry. Always keeping one side of you towards a wall, reduces the angles from which you can be engaged.
Medical #
Devices & Tools #
ParaMed Medical Device: Also known as a MedGun, is the most advanced handheld medical tool currently in the game. It provides injury information and can automatically select the necessary drugs required for the sustained injury.
- It is recommended to equip this on your right thigh, as using the “V” key to draw it, is the fastest method.
- To heal yourself, draw the tool and use the “B” key to target yourself, and pull the trigger.
- Using this tool to heal results in less BDL (blood drug level) than a MedPen for incremental healing.
- The advanced mode allows use of other drugs (basic mode only allows Hemozal) to manually select the drug and dosage (see drugs section below).
LifeGuard Medical Attachment: The LifeGuard Medical Attachment is an attachment for the Multi-Tool. It allows users to heal players and NPCs using only one drug (Hemozal). It does not provide information about the patient’s health, unlike the ParaMed Medical Device
MedPens: These are one-time use medical pens that inject the specific drug, based on the colour of pen you’ve equipped. These are useful to use in active combat situations, as it is faster than a ParaMed Medical Device. To inject yourself left mouse-click to inject another player right mouse-click.
Injury Tiers #
- Tier 3: Minor injury which decreases your health and causes minor impairments or reduction in movement speed depending on the location of the injury.
- Tier 2: Moderate injury that causes a significant reduction in movement and/or your senses, as well as potentially cause limping.
- Tier 1: Severe injury that can result in an incapacitation and/or impair you from certain activities (e.g. flying a ship if it is your arm, ability to carry items or shoot, etc.).
- Unconscious: You will enter an “impaired” state that requires medical attention from another player, as well as reduce your vision significantly. You can use 3rd person to get a better view of your surroundings if you’re assisting teammates. It is advisable to have your tractor-beamed by a teammate to a safe location for revival and healing.
Medical Drug Details #
| MedPen | Medical Ingredient | Effects |
|---|---|---|
| AdrenaPen | Demexatrine | Reduces concussion symptoms, normalizes weapon handling and movement speed |
| CorticoPen | Sterogen | Reduces vision and hearing symptoms, normalizes stamina |
| DeconPen | Canoiodide | Reduces injuries from radiation |
| DetoxPen | Resurgera | Revives overdosed person (if not incapacitated), doubles decay rate of Blood Drug Level |
| MedPen | Hemozal | Restores health and stops bleeding, recovers from incapacitated state |
| OpioPen | Roxaphen | Reduces pain symptoms, normalizes movement ability |
Blood Drug Level (BDL) #
Every time you use a MedGun or MedPen, your BDL will be increased (with the exception of Resurgera which increase the speed at which your BDL goes down). The various types of BDL induced impairments are:
- Movement: Walk and run speed is reduced.
- Vision: Blurred vision resulting in the inability to see.
- Weapon: Your aim will be impacted by swaying.
- Piloting: Your ability to use certain controls will be impacted, and become less responsive.
It is best to use a MedGun over a MedPen when healing, unless you are in active combat, as the BDL increase using a MedGun is corelated to the amount of healing, while the MedPen increases your BDL by a set amount, regardless of the amount of healing.
Various Tips & Tricks #
Looting #
- When looting another body, move the persons undersuite to yourself first, it will swap all gear from you to them and vis-versa. You can then recover your items back from their body.
- Picking up a weapon is easiest when you don’t already have some on your back/hands. Best approach is to store your current weapon into your backpack and then pick up the item on the floor.
Key Binds #
This is not an exhaustive list of default key-binds, but rather ones that aught to be known:
- “B” – Change Weapon Fire Mode (where available)
- “T” – With a helmet on, this turns on your flashlight (combining this with your weapon flashlight is blinding towards your target)
- “U” – Weapon under-barrel attachment activation.
- “V” – Equipping your MedGun on your right thigh and using “V” will pull it out faster than any other method.
- “Left Alt + H” – Equip/unequip helmet (attaches to your “hip”)
- “Left Alt + 1” – With your gun out, this will consolidate your ammo, combining your partially used magazines.
- “Left Alt + X” – Wipe your visor to clear any blood, condensation, or weather effects.
- “Shift + S” – On a ladder, this will slide you down much faster instead of climbing
- “Mouse Scroll” – Increase/reduce movement speed on foot
Pathway Setting #
When trying to navigate to a location within a station, base, or ship (not located behind a locked door), it is useful to open your map and use the “R” button while placing your mouse on the location you’re moving towards. This will set a pathway routing you towards your location, which is visible on your minimap.
Food & Drink Effects #
| Buff or Debuff | Effect | Type |
|---|---|---|
| Hypertrophic | Stamina cost reduction | Positive |
| Atrophic | Stamina cost increase | Negative |
| Energizing | Stamina regeneration increase | Positive |
| Fatiguing | Stamina regeneration decrease* | Negative |
| Cognitive Boosting | Reduced weapon sway | Positive |
| Cognitive Impairing | Increased weapon sway* | Negative |
| Hypometabolic | Hunger decay decreased | Positive |
| Hypermetabolic | Hunger decay increased | Negative |
| Hydrating | Thirst decay decreased | Positive |
| Dehydrating | Thirst decay increased | Negative |
| Healing | Applies healing over time* | Positive |
| Toxic | Applies damage over time* | Negative |
| Immune Boosting | Increases sickness resistance* | Positive |
| Immune Suppresing | Decreases sickness resistance* | Negative |
| * Effect currently not in game or not modeled. Information about this is effect is mostly speculative at this time. | ||
| Buff and debuff stat numbers are still being researched. | ||
| Positive buffs have a small + symbol above what they are affecting, negative ones have a – symbol | ||
Pyro Optimal Food #
FPS missions in Pyro: Cruz Lux + Synergy (Gives Hydrating, Energizing, Hypometabolic, Hypertrophic)
- Cruz Lux is available from any Pyro station’s Cargo Deck.
- Synergy is only available from the Stanton Gateway
Cruz Lux + Reclaimed Water + Karoby Energy Bar (Tahini & Carob) (Gives Hydrating, Energizing, Hypometabolic, Hypertrophic):
- Cruz Lux the Karoby Energy Bar are available from any Pyro station’s Cargo Deck.
- Reclaimed Water can be purchased in various kiosks on any station.
 Author: NazTheEternal
 Collaborators: Pontik
- This manual was compiled in version 4.0.1 of Star Citizen, some of the information may change or become obsolete in later version of the game. ↩︎
- The data used in this document was gathered from v.4.0.1 compiled by Dabalta ↩︎


